They’re just paper cuts, I’ll sellotape them up.

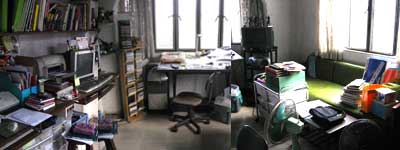
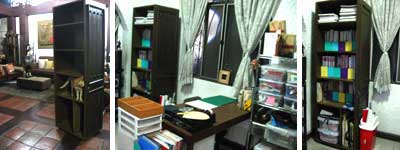
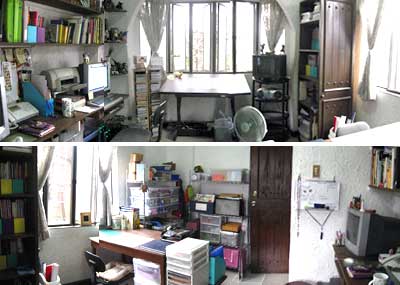
Because I have a new efficient workspace, I thought of giving my nearly two-year-old yet never-been-used Print Gocco a whirl today.
.
Gocco
Finally! It’s been sitting inside that box for too long. These pics were taken in October 2006.
.
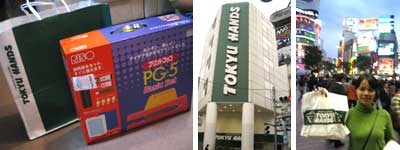
I bought my Print Gocco PG-5 at the Shibuya Tokyu Hands in 2006 for an amazing 6825yen (or US$63.60)1 — I say amazing because it can cost as much as US$1952, about thrice what I paid for!, in some US Gocco supplier shops so I would say that Japan is the best place to get it from3. Just remember to pronounce it this way, Purinto Gokko, to avoid awkward Rost in Transration moments. ๐Ÿ˜‰

UPDATE (9.20.08): Exciting news, everyone! I just found out that the Gocco and its supplies are available here in the Philippines! Tin, a stay-at-home-mom based in Iloilo sells Gocco kits, inks, bulbs, and other paraphernalia you will need to lead the Gocco life via her cute little shop, One Tiny Party. Her site also features pics of her pretty Gocco’d artworks and a lot of helpful tips and links for everyone interested in going Gocco. [go!]
.
So let me take you through my enjoyable Print Gocco experience.
.
Gocco Step by Step
.
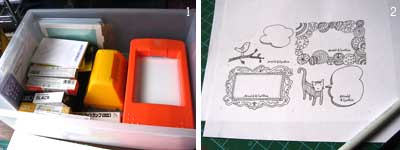
1) Aww, that’s little PeeGee with all her accessories inside her crib. Since Gocco supplies are hard to come by in the Philippines4, I made sure to stock up on inks, screens, and bulbs when we were in Japan.
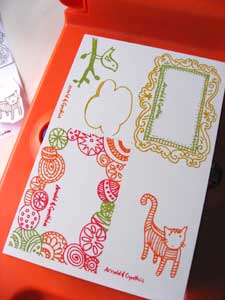
2) I wanted to conserve my bulbs and screens (the bulbs especially since you need two bulbs per print and they can only be used once) so to make the most of them, I made 4 gift tag designs to fit one 4″ x 6″ screen. I used the special carbon ink based pen that’s specially made for use with the Gocco to sketch my master.
.
Gocco Step by Step
.
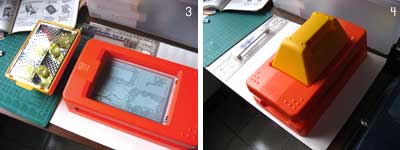
3) The bulbs are now screwed onto the print hood and my master has been inserted into the PG window.
4) A quick, heavy press on the lid will cause the bulbs to flash, indicating that the master image has been burned to the screen.
.
Gocco Step by Step
.
5) And the fun begins: here’s my screen after I squeezed paint on it. I made sure to put blocking tape in between the portions where I didn’t want color to bleed into each other.
6) The screen is now positioned inside the PG’s lid again and we’re ready to get it on. Printing via Gocco produces results similar to silkscreen printing except that the process is easier, less messy, and lots of fun but, okay, more expensive because of the limited availability of supplies.
.
Gocco Step by Step
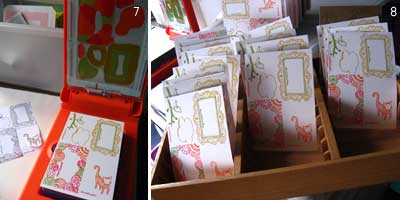
7) Tadah, my very first print!
8) Here they all are, waiting to dry. Incidentally, the wooden case is a cassette tape crate given to me ages ago by my brother. I haven’t used it in a while5 but I discovered that it makes a good card-drying rack.
.
Gocco
.
Not so bad for a first print although I would’ve wanted it to be less colorful. And now I can’t wait to try using layers and different paper patterns and textures so I guess you’ll be seeing more of these printing experiments from now on.
.
(For those who ended up on this site looking for Print Gocco PG-5 instructions, allow me to point you to the excellent tutorial by Felt Cafe which I myself referred to while working on my prints.)

  1. PHP 2,565.20 according to the XE-UCC[ back]
  2. PHP 7,868.25[ back]
  3. But if you can’t wait and must have it NOW, then it’s worth coughing up the dough for.[ back]
  4. And ordering online internationally is mucho expensive.[ back]
  5. Who listens to tapes anymore?[ back]
Share
Read More

In this room, in this room of mine.

I’ve been wanting to do a home office makeover1 for the longest time, and it was last month’s termite invasion that pushed me to finally do it. I’ll tell you why later.
.
First, let me show you what the soho used to look like.2:
.
Office - before
Ugh, is that a mess or what. Believe it or not, we worked in this kind of environment for close to three years. Arn later relocated to a breezier section in the house since he likes working closer to nature so this office is essentially mine now.
.
The makeover idea was sparked when I decided to lose the highly under-utilized green couch (on the right, behind all the clutter) and replace it with a table I found sitting in our compound’s common garage. I decided that I needed a spot to do my art and paper crafting, especially since I already had the supplies but just did not have the space for it. I was actually fine with that slight change for the meantime… and then we discovered that the termites had eaten into the built-in wardrobe3 that housed a lot of our files! Eep! Obviously the best only solution was to tear it down.
.
Office - cabinet
It was a beautiful piece of woodwork but unfortunately, it’s just not meant to house “office” files.
.
Obviously the next problem was where to put all the stuff that was in the cabinet. (And what a whole load of stuff that was!)
.
Office - stuff
Dear oh dear. Just looking at that photo makes my head hurt.
.
Three major criteria we considered in buying new storage supplies were (a) termite deterrence; (b) sturdiness; and (b) pocket-friendliness. The industrial shelving and plastic containers we bought all met what we were looking for, and it really helped much that the SM in our area had a 3-day sale last weekend.
.
Office - WIP
The office taking shape slowly but surely. Yes that’s a Print Gocco PG-5 Abbas is sitting on! Bought it for 6,825 yen at a Tokyu Hands in Shibuya a couple of years ago. See I couldn’t even use it before because I didn’t have a proper work surface.
.
Suddenly there was so much space and I excitedly put everything in order once the paint dried up. It took about a week and a half for everything: construction, cleanup, and sorting/deciding what went in and out of those boxes and shelves because there were just too many things to go through.
.
Office - Taking Shape
Looking good, looking good… now, everything’s within reach unlike before when they were stuck in the depths of that gigantic cabinet.
.
And oh, I also found a way to save the handsome narra cabinet doors – we saved what we could of the wood and then had them built into a book case for all my magazines and reference materials.
.
Office - Bookcase
This way, those slabs of wood can still live in their “home”. ๐Ÿ™‚
.
Here, now, are the token “after” shots of my improved soho. I can definitely see myself working more efficiently in this space… well, granted that it stays neat and orderly. ๐Ÿ˜‰
.
Office - Daytime
Now to buckle down and work, work, work.
.
Cost breakdown:
– Carpentry work: P400/day for 7 days= P2800
– Zen floor tiles (10 pcs) = P465.12
– Paint, primer, paint remover, cement= P545
– Varnish (for bookcase and table)= P190
– Industrial shelving: P2,200 x 2 = P4,400
– Plastic containers (on sale) = P3,000
TOTAL: 11,400.12.4

  1. Whatever for did I watch all those episodes of Merge, Clean House, and Design Remix when we still had the Lifestyle channel?[ back]
  2. Before you label me a slob though, can I just remind you that — ahem — Creative Minds Are Seldom Tidy.[ back]
  3. This office space used to be a bedroom and the cabinet was meant to house clothing, hence the size and depth.[ back]
  4. I would’ve wanted to stay below the P10,000 mark but we wanted to invest in sturdy shelving and storage and I think that decision will save us more money in the long run.[ back]
Share
Read More

I'm Cynthia Bauzon-Arre, a Filipino watercolor artist & graphic designer. I live in QC with my graphic novelist husband Arnold and our friendly marmalade tabby Abbas. This blog has been chronicling my life, likes, and loves since 2001. [ more ]

view my portfolio

Categories

Archives