Since White Nights (a.k.a. St. Petersburg) Watercolors from Russia became available here in Manila via Deovir, I’ve read a lot of reviews online and have even heard from art-friends that they are easy to re-wet and are highly pigmented. So, being low on EQ I decided to get a few pans for myself. You might already know that I’m not a fan of buying sets (though I have some but they’re either gifts and/or were purchased when I hadn’t the slightest clue about pigments and lightfastness) so I made sure to do my research before buying the paints. My self-imposed rules:
- I must be able to use the colors and their combinations in what I love to draw the most — faces, food, and felines (okay, animals in general :))
- The colors must consist of single pigments — this is to ensure lightfastness and also reduce the incidence of mud when layering.
- They have to fit into my handy DIY mint tin palette, meaning a maximum of 9 pans was in order.
- I can’t spend over P1,000.00 because do I really need another set of paints? Umm, no (see previous post), but then need is sometimes < want. Fortunately White Nights, like ShinHan, isn’t as expensive as the other brands so I was able to stay below my limit.
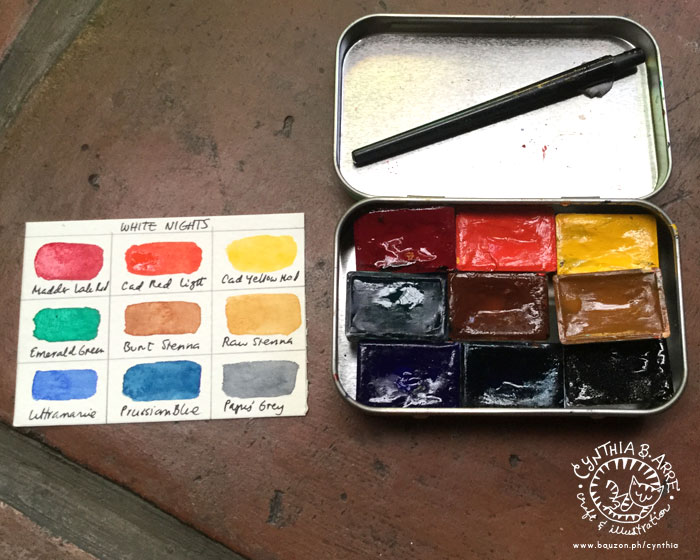
So taking all that into account, here are the colors I ended up with along with their pigment info & light fastness ratings:
— 2 reds (1 cool, 1 warm): Madder Lake Red Light (PR 187 / LF ***) and Cadmium Red Light (PR 108 / LF ***)
— 1 warm yellow: Cadmium Yellow Medium (PY 35 / LF ***)
— 1 green: Emerald Green (PG7 / LF ***)
— 2 earth hues: Raw Sienna (PBr 7 / LF ***) and Burnt Sienna (PBr 7 / LF ***)
— 2 blues (1 warm, 1 cool): Ultramarine (PB29 / LF ***) and Prussian Blue (PB27 / LF ***)
— 1 neutral: Payne’s Grey (PBk7, PB15, PV3 / LF **)
[source]
The last one, Payne’s Grey is not a single-pigment color (it’s made up of 3 pigments) and is something I could’ve gone without since I can mix greys using some of the colors so it’s really just a handy “convenience hue” for days when I can’t be bothered to do extra mixing. 😀
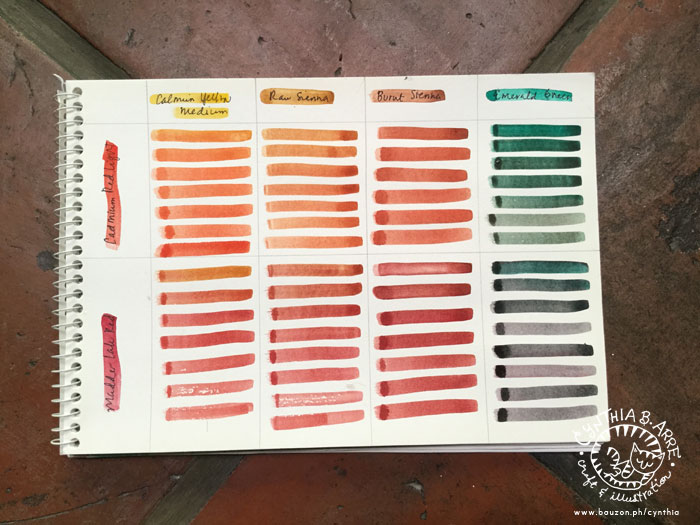
Just to show you the range of colors that are possible using just these 9 pans, here are a couple of watercolor charts I made:
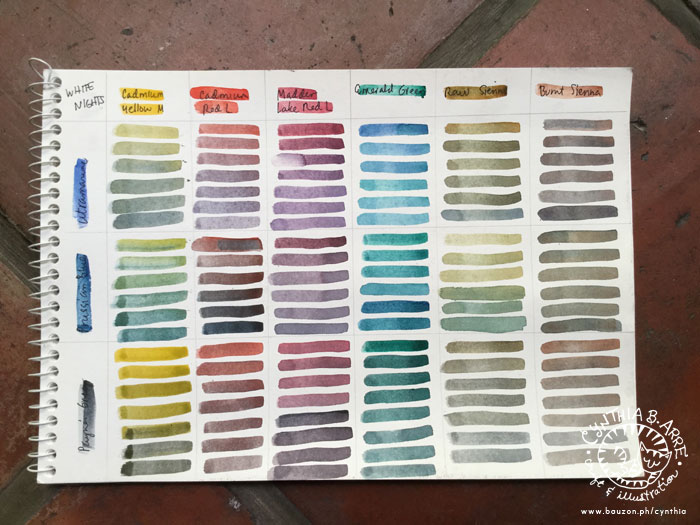
This one (above) shows the range of color combinations and tonal ranges that can be achieved from mixing the brights with the darks. And just because I always paint portraits and people, I made a separate color chart mainly for the reds and yellows (below). I just added the column for green since there was extra space.
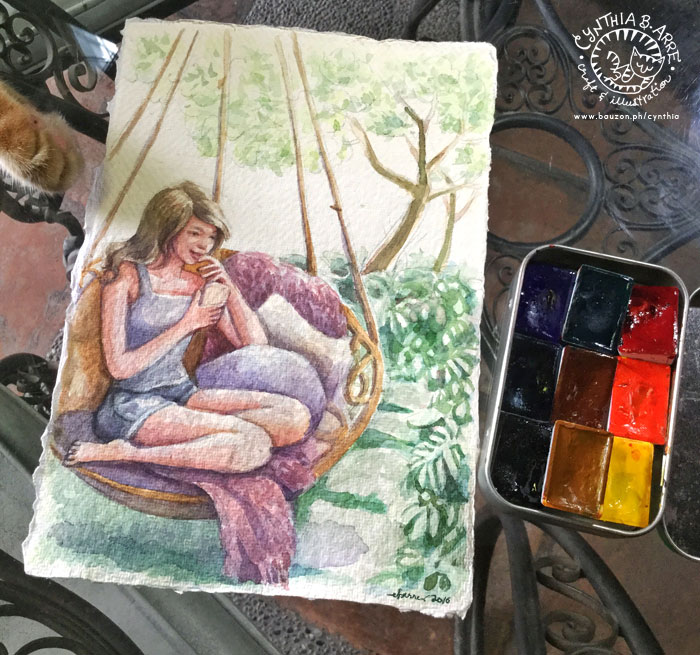
Here’s something I painted using just the colors in the palette (you can view the work-in-progress video on my Instagram). I used them on Khadi Paper purchased a while back from ArtWhale.
My capsule review for White Nights Watercolors:
1. Indeed they are easy to re-wet, pick up with the brush and are highly pigmented (some colors more than others though)
2. They are also highly transparent — except for the Cadmiums which are opaque — so they are great for layering.
3. At only P87.00 per pan (except for the Cadmiums which are I think P120 / pan), they are quite affordable. My customized set amounted to around P849.00 and it consists of colors that I will actually use. (Sets usually have 3 or more pans that I always end up never using.) Also, these are FULL pans, not half pans, so you get a lot of paint for your hard-earned cash. 😛
And here is something else I painted using White Nights, a simple maguro sushi for my Youtube Channel (hah! If you’re one of my whopping 3 regular viewers, thank you for not laughing at my attempts to make these home videos <3)
Other observations:
1. ShinHan, Holbein, and Daniel Smith are still my favorites in terms of color intensity and flow but I’m happy to have this inexpensive set of vivid paints for drawings that will be scanned and for practice work. Van Gogh, my student-grade set that was a birthday gift from Arnold last year, is my other go-to for practice work but they are strangely more expensive than White Nights.
2. The pans remain moist for a while so I can’t close the lid of the tin until they dry completely because they might stick in the lid when I store them sideways.