Posts Tagged "rubber stamp carving"

Where I buy art & craft materials in Manila

Years ago National Book Store was the only easily accessible place where you can buy arts and crafts equipment here in Manila. Well there was Joli along Espana and Artek in Delta but they were quite far, and online shopping — let alone the internet — was unheard of at the time. So by default NBS was The Mothership and to be fair, selection wasn’t bad. It’s just that compared to today, we had a very limited range of art materials to choose from.

And now — okay I don’t know when exactly the local arts and crafts movement boomed but it sure happened when I wasn’t looking. Very pleased though that I don’t have to turn to DickBlick or Amazon’s Arts, Crafts & Sewing section for supplies anymore since I can now easily get them locally and from within the comforts of home, no less.

If you check my Instagram feed, you’ll see that I’ve been into honing my analog art skills since late last year and I’ve explored everything from rubber stamp carving and shrink plastic crafting to watercolor painting and even lettering. Here are the stores I’ve been getting all my crafty goodies from. There may be more out there but I find the following shops’ inventories sufficient for my needs.

(Updated on Jan. 6, 2018)

ARTWHALE an online store that carries beautiful not-so-commonly-available paints like Korea-based Nicker fine art gouache (a.k.a. the brand that Ghibli Animation Studio uses), Japan-based Turner Colour Works Acryl Gouache, Peerless Watercolors (a vintage American brand known for highly pigmented watercolors in sheet form), and Shin Han Art Korean Watercolours. The proprietor Kuki is very friendly and knowledgeable about their products and customer service is top notch. (Please refer to this newer post for the full story. :D)

art-whale-philippines

They have pop-up stores every once in a while so I recommend following their Instagram account to see if they’ll be in a bazaar soon.

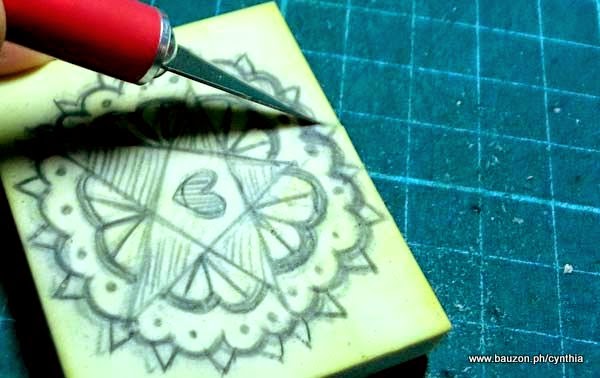
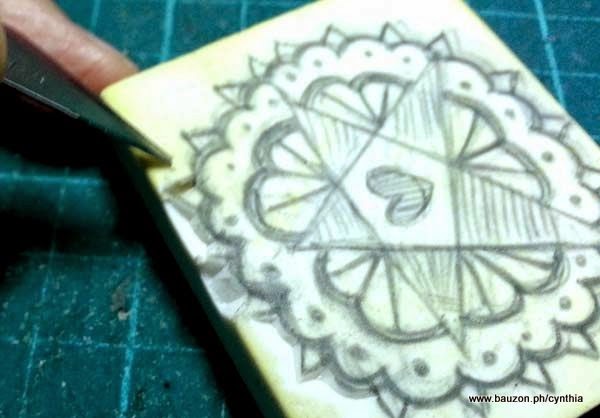
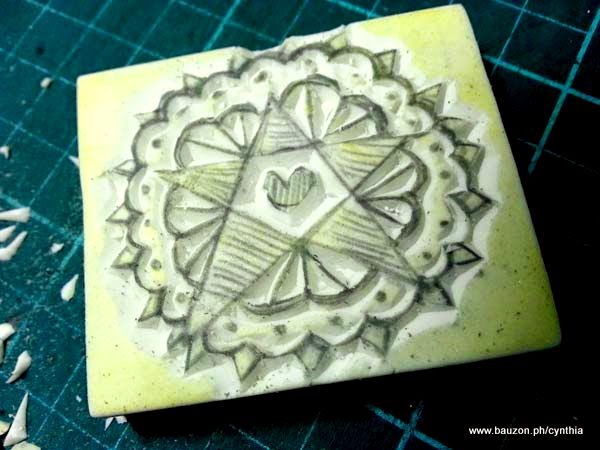
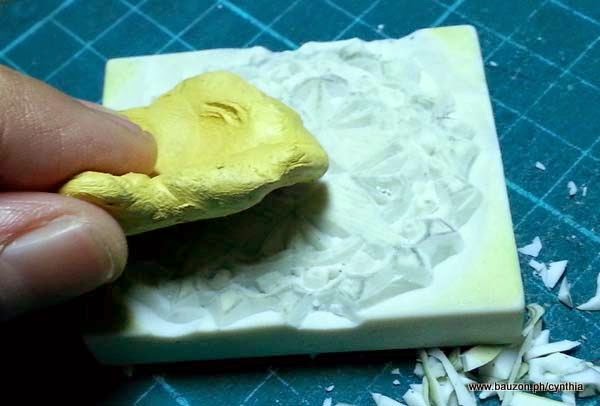
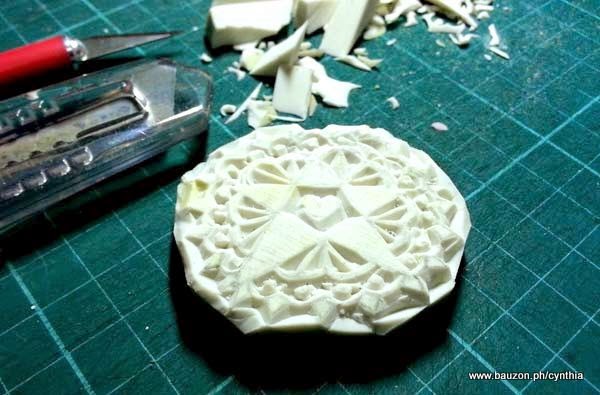
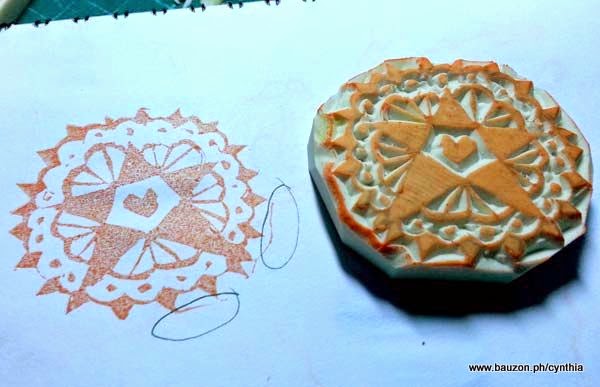
CRAFT CARROT – an online store based in Loyola Heights, Quezon City. They stock artist paints & paper, calligraphy tools and inks, sketch markers, and rubber stamp carving supplies. I got my two-tone carving blocks — 4″x 6″ and 2″x 2″ round and square blocks — from them (see below). I also purchased a few of the inexpensive “Craft” brand ink pads. I don’t think they’re archival though so I just use them for testing my stamps.

craft carrot ph

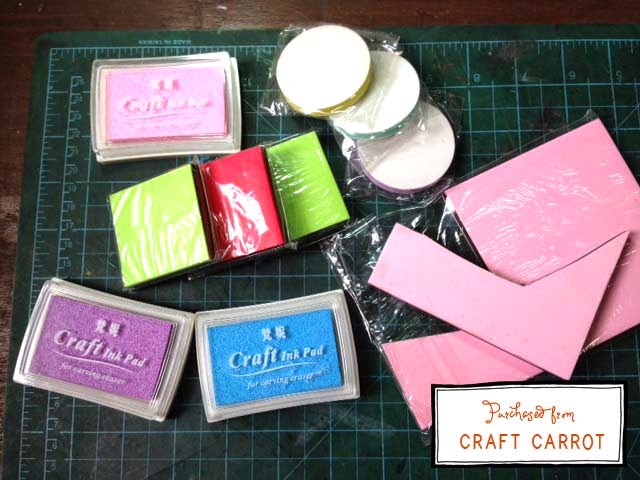
I’m not sure if they have a physical shop since their website says you’ll have to set up an appointment before visiting their office but ordering online is quick and painless. I’ve already purchased from them twice and both times I received fast and friendly service – “friendly” meaning there is actual communication from the shopkeepers, not just automated replies. 🙂 Also, they use Xend.com for shipping so you’ll be sure to get your items within 24-48 hours upon receiving confirmation for your order.

HEY KESSY – another online store with an HQ in Loyola Heights which I believe is a physical shop. They sell washi tape, chalk markers, air dry clay and a good variety of fun crafting supplies. They’re the only place I’ve found that carries Tsukineko VersaCraft Fabric Inkpads (pigment-based, archival, and acid-free) and Speedball Speedy-Carve Carving Blocks
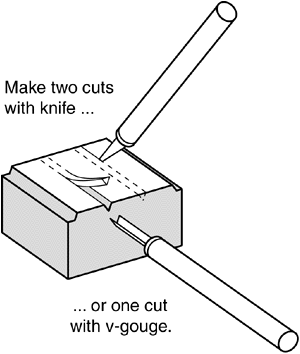
, currently the biggest (and priciest) ones that are available locally. These blocks carve like butter — no, wait. Like konnyaku jelly! Soft and jiggly! — so I use them for special, intricate designs.

hey kessy

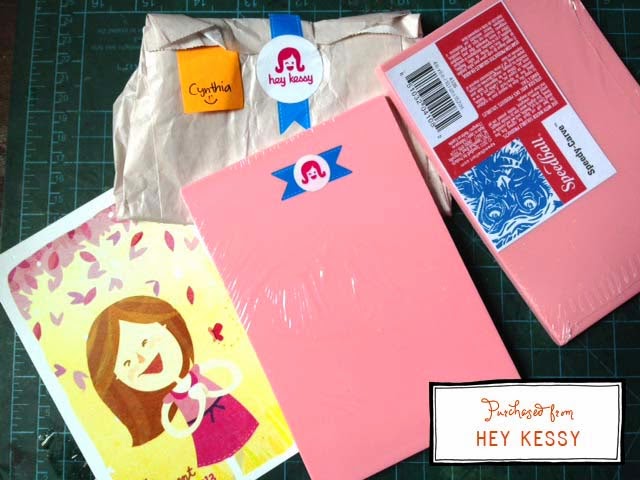
I can also say that they know how to make their customers feel special. Aside from the friendly correspondence, they sent me that adorable postcard on the left. Look at how the items were packaged too. It was like opening a gift. (It’s all in the details. 🙂 ) I’ll definitely buy from them again — but first, I need to use up my blocks. As with Craft Carrot, you can receive your items within 24-48 hours.

CREATE CRAFTS – a.k.a. CreatebyTLF is another online store based Quezon City. There is no physical shop but they have a display at Mrs. Graham’s Store in Scout Rallos which is restocked twice a month. So far I’ve bought 1.75″x 3.5″ eraser blocks (sold by the dozen!) and Japanese keshigomu carving blocks (smaller than the ones from Craft Carrot and Speedycarve but they carve just as smoothly), Kuretake ZIG Clean Color Real Brush markers, and Speedball Lino Cutter spare blades.Create Crafts PH

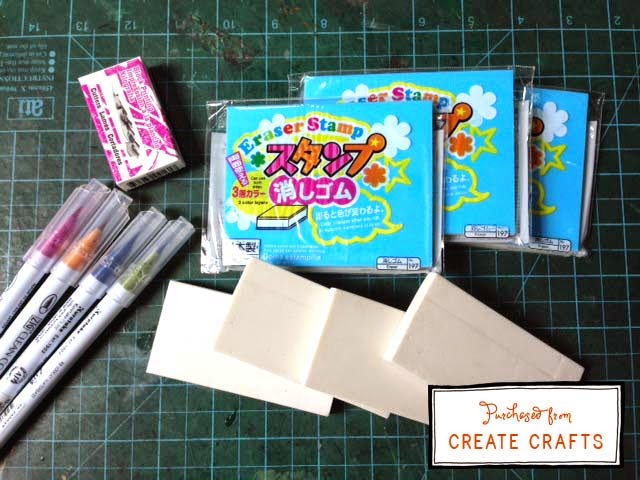
When you buy from their site, you have the option to create an account which facilitates ordering in the future since you won’t have to input your details all over again. Becoming a site member also entitles you to occasional perks like free shipping — just keep your eyes peeled for promos (I was able to avail of that last December.)  I’m not sure if they really don’t update customers with tracking numbers via e-mail but my purchases appear at my doorstep right on schedule which makes up for the lack of communication.

BEE HAPPY CRAFTS – is a crafting and party supplies store in Caloocan, open to customers on Saturdays but you can also order from them online. They stock a lot of scrapbook and journal-keeping goods like stamps, stickers, scrapbook sheets, punches, cardboard stock, ribbons, etc. They’re also the only place I’ve found that stocks unbranded shrink plastic locally. I’ve ordered a few sheets of the Inkjet shrink plastic and have found that they hold ink well and shrink almost exactly like the Shrinky Dinks-branded ones that I bought from Amazon (please see my Instagram feed or the previous post for examples of what I’ve done with the material).

bee happy

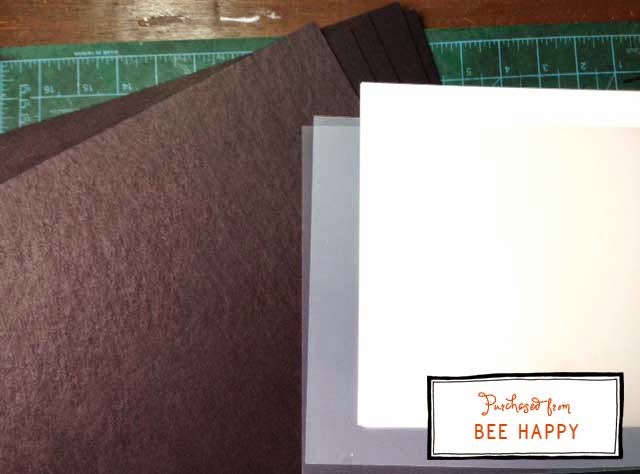
The Inkjet sheets are a little pricey at P90/piece but I’m glad to have an option to ordering them from overseas. I’ve also bought some cardboard stock from them for mounting. The site is easy to use and you will receive email confirmations for your order. You may also follow up with them through sms.

… and finally DEOVIR

I love that they have physical stores in malls which means that I can get my materials on the same day I need them. The selection in their SM North Edsa outlet is impressive and Arnold has been buying his Micron drawing pens, watercolor paper, and comic tools from there for years. You can also buy from them online but I haven’t done so yet since SM is close by. Also, there are items in the physical stores that aren’t on the site so it’s more advisable to swing by the actual shop and see the merchandise first hand.

I’d love to know where you shop for your art materials. And if you know of other stores that I may have missed (or don’t know about yet), do let me know in the comments!

Share
Read More

How to Carve Rubber Stamps With Just an X-Acto Knife (A Tutorial)

When I posted some of my eraser stamps on Instagram, some crafty friends were surprised to learn that the X-Acto Knife is all I’ve been using for carving1. It seems that most rubber stamp crafters — and I’ve noticed this on a lot of web tutorials I’ve read and watched  — prefer to use lino cutters, more specifically, the Speedball Linoleum Cutter set which I want myself. That set contains a thin, V-shaped blade that looks especially useful for gouging out narrow “canals” between outlines — a pain to attempt with the straight-edged X-acto blade.

X-Acto Knife vs. a V-Gouge

See what I mean? (via Lime Green News)

As mentioned previously, I’ve already ordered the set but while waiting I had to train myself to carve using the humble, easily available, and familiar2 pointy blade. Drama aside, if you want to start carving and like me, a craft knife is all you have, I will now share the process with you. I’ll even start from the very beginning — a very good place to start. *cue Julie Andrews*

** I’m by no means an expert at this. I just want to share what works for me so far. 🙂

Materials:
– a 2B lead pencil
– tracing paper
– a rubber eraser
– an X-Acto knife
– an ink pad
– blu tack (optional)

rubber stamp carving tutorial

1. Plan out the image you want to carve. Shade-in the areas to keep solid to guide you when you carve later. These doodles are “parols” or Filipino Christmas lanterns and I plan to use these on homemade gift tags.
2. Trace your “master” illustration onto tracing paper with a 2B lead pencil.

how to carve eraser stamps with an x-acto knife

3. Place the tracing paper on top of your eraser or carving block, penciled side down. Rub on it with something firm like a pen’s bottom or a bone folder to transfer a mirror image of your sketch.

how to carve a rubber eraser stamp

4. Totally optional but if I’m not using a two-tone carving block, I like tinting my surface lightly with some color. This is so I can easily see which areas have already been carved. Just dab a piece of tissue paper into your ink pad then pat it onto your eraser / carving block, just gently enough to tint it with color.

carve a rubber stamp with a craft knife

5. Start outlining your image with the X-Acto blade at a 30-45 degree angle << — very important. Remember to slice lightly because if you insert the knife too deep, it will be difficult to maneuver the blade which will result in tugging and therefore risking (a) ruining your stamp, and (b) piercing the finger you’re holding the stamp with. (Unfortunately for me I encountered all of the above on a couple of my initial carving attempts).

how to carve a rubber stamp with an X-acto knife

6. After you’ve outlined an area, lift the blade and turn the eraser around. Again with the blade inserted on a 30-45 degree angle, carve a curved line a short distance away from the outline you made towards the opposite direction from where you made the cut earlier. Try to “meet” the already-sliced areas with your blade’s tip, you’ll see that areas will begin peeling off. This is my favorite part. 🙂 (Gosh I hope that made sense. Please see photo above for reference.)

how to carve an eraser stamp tutorial

7. Soon your stamp will look like this. See how all my cuts are angled?

how to carve an eraser with an x-acto knife

8. Completely optional again but if you have some Blu Tack (mine’s about 15-years old and it still works and lol it’s not blue) lying around, you can use that to remove pencil marks as well as stubborn little bits of eraser stuck inside crevices.

how to carve a rubber stamp x-acto knife

9. Trim your stamp using a box cutter. Trimming it to size will help in stamp positioning later on.

rubber stamp carving x-acto knife

10. Make a test print. This will allow you to see which areas still need fixing. It doesn’t really need to be perfect though — part of a rubber stamp’s charm is its rough handmade quality. (Such a good excuse, ‘no? 🙂 )

A photo posted by Cynthia Bauzon-Arre (@arncyn) on

11. And here are the finished stamps. 🙂

If my instructions — especially in #6 — weren’t clear to you, watch this demo by the amazing Tsukui Tomoko. She uses both a box cutter (!) and a V-gouge in the video but the box cutter method at the beginning of the video is what I’ve been doing with the X-Acto knife.

Did this help you somehow? If you have other carving tips or techniques, I’d love to hear all about them!

  1. Our discussiions are here and here [ back]
  2. oh X-Acto, how many frisket films did I cut with you back in college? [ back]
Share
Read More

Tokyo Design Festa November 2014 + Rubber Stamp Carving WIP

What I’m working on right now…

rubber stamp carving progress

… is a continuation of the update I posted on Instagram last night.1 I made these jeepney, tricycle, and pedicab doodles 2  a week ago and thought of printing them on the Gocco… until I realized that I didn’t have enough screens.*headdesk*  But as explained in the previous post, this is what led to my interest in rubberstamping in the first place which just proves that necessity is the mother of inven innovation (and crazy new obssessions).

***

On the home front, Arn is happy that I’m spending evenings being artistic — not just vegging out in front of the TV watching J-dramas (Teehee. Now you know. ) So now I’m either carving or doodling while my iTunes blasts out J-pop. Same difference. 🙂 I’ve actually been semi-passively studying Nihongo since 2011 but I’ll reserve that story for another time…

Before I went off-tangent, I was gonna say that Arn and I have been talking about what sparked this sudden desire to create with my hands.After some thought, I had the answer: Design Festa!!!

This cheezy photo below was taken at the Design Festa Gallery in Harajuku, Tokyo in 2006. (Whattapose *cringe*)

(More photos — and cheezy poses — in my old Flickr gallery)

That was the first time I heard of it. Since then I’ve been wanting to attend the actual festival but our timing was always off. When we planned our trip for this year, I made sure to check the schedule. They usually hold it in May and November. We chose to go in the fall because Tokyo would be just as hot as Manila if we went in the summer.

So here I am all giddy, holding our pre-bought tickets which we purchased at the HQ in Harajuku (the same place in the 2006 photo I posted above). We actually arrived at Tokyo Big Sight 30 minutes before it opened.

design festa 2014

This is not even half of the crowd that was there bright and early. See how behaved and properly-queued up everyone was though.

Design Festa 2014

Inside, the place was bursting with kawaii, I didn’t know where to start!

Design Festa 2014

I went bananas over all the cute stuff and even had photos taken with the very friendly and talented artists who were only too happy to indulge our whims.

Design Festa 2014

Design Festa 2014

Arnold, meanwhile, enjoyed taking photos and videos of the kids who were painting on the scene.

Design Festa 2014

Design Festa 2014

Design Festa 2014

We originally planned to stay until around 4pm so that we could go somewhere else afterwards but we ended up leaving at 8pm, closing time, because there was so much to feast our senses on. Indie bands were playing outside. Strange short films were showing upstairs. A diverse selection of food carts dotted the place. At the end of the day my tote was filled with handmade puraban brooches, plushies and some stationery. Arn bought several art cards and  indie comics. Ironically, I didn’t notice any keshigomu hanko (hand-carved erasers) although I’m positive there was a whole section devoted to it…

There are more photos in this Google album.

***

Hope you enjoyed this post and hopefully I’ll have finished prints to show in my next post! 🙂

  1. Please pardon the dirty cutting mat… I’ll clean it this weekend![ back]
  2. The jeepney was especially tedious to carve because of all the detail I put! Masochist much?[ back]
Share
Read More

I'm Cynthia Bauzon-Arre, a Filipino watercolor artist & graphic designer. I live in QC with my graphic novelist husband Arnold and our friendly marmalade tabby Abbas. This blog has been chronicling my life, likes, and loves since 2001. [ more ]

view my portfolio

Categories

Archives